Thursday, February 28, 2013

Expanding the Post Content

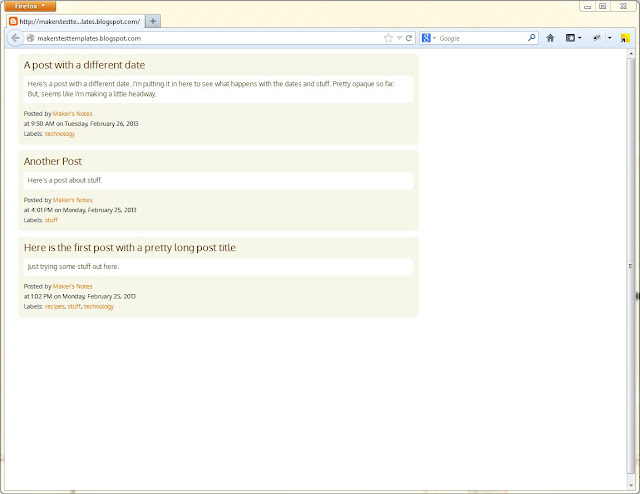
Now it's time to expand the post content. In this iteration, I'm going to add the post body and a post footer. When finished, it will look like this:
 

Time and Date Stamp

Note that the time and date stamp (second line of the footer) includes the date stamp for every post. Often in Blogger templates, the posts are grouped by posting date. I opted not to have this sort of grouping. I picked up how to do this from this posting

You'll see that I added the recommended variable declaration at line 117:
      <script type='text/javascript'>   
       var postDate=&quot;&quot;;   
      </script>  

And then, the actual code to insert the posting date is on lines 200-209.
        <b:if cond='data:post.dateHeader'>  
         <data:post.dateHeader/>  
         <script type='text/javascript'>  
          postDate = &quot;<data:post.dateHeader/>&quot;;   
         </script>  
        <b:else/>  
         <script type='text/javascript'>  
          document.write(postDate);   
         </script>  
        </b:if>  
Basically, what this says is:
  1. If there is a dateHeader, then insert the dateHeader and assign the value to the previously-declared variable.
  2. Otherwise, insert the contents of the previously-declared variable.
Good stuff!


Template Code
 <?xml version="1.0" encoding="UTF-8" ?>  
 <!DOCTYPE html>  
 <html   
  b:version='2'   
  class='v2'   
  expr:dir='data:blog.languageDirection'   
  xmlns='http://www.w3.org/1999/xhtml'   
  xmlns:b='http://www.google.com/2005/gml/b'   
  xmlns:data='http://www.google.com/2005/gml/data'   
  xmlns:expr='http://www.google.com/2005/gml/expr'  
 >  
  <head>  
   <link href='http://fonts.googleapis.com/css?family=Bitter' rel='stylesheet' type='text/css'></link>  
   <link href='http://fonts.googleapis.com/css?family=Marcellus' rel='stylesheet' type='text/css'></link>  
   <link href='http://fonts.googleapis.com/css?family=Molengo' rel='stylesheet' type='text/css'></link>  
   <link href='http://fonts.googleapis.com/css?family=Oxygen' rel='stylesheet' type='text/css'></link>  
   <link href='http://fonts.googleapis.com/css?family=Quando' rel='stylesheet' type='text/css'></link>  
   <link href='http://fonts.googleapis.com/css?family=Roboto' rel='stylesheet' type='text/css'></link>  
   <link href='http://fonts.googleapis.com/css?family=Roboto+Condensed:300' rel='stylesheet' type='text/css'></link>  
   <meta content='IE=EmulateIE7' http-equiv='X-UA-Compatible'/>  
    <b:skin>  
     <![CDATA[  
     /*  
     -----------------------------------------------  
   
     ----------------------------------------------- */  
    /* Variable definitions  
     ====================  
   
      <Group description="Post" selector="body">  
       <Variable   
        name="post.title.font"   
        description="Font for Post Title"   
        type="font"  
        default="normal normal 13px Oxygen, sans-serif"   
        value="normal normal 13px Oxygen, sans-serif"/>  
       <Variable   
        name="post.body.font"   
        description="Font for Post Body"   
        type="font"  
        default="normal normal 12px/18px 'Oxygen', sans-serif"   
        value="normal normal 12px/18px 'Oxygen', sans-serif"/>  
       <Variable   
        name="post.title.color"   
        description="Post Title Color"   
        type="color" default="#4c2600"   
        value="#4c2600"/>  
       <Variable   
        name="post.body.color"   
        description="Text Color"   
        type="color"   
        default="#ffffff"   
        value="#495025"/>  
      </Group>  
   
      <Variable name="post.wrapper.width" description="Width of the Post Wrapper" type="length" default="700px" value="700px"/>  
      <Variable name="post.body.width" description="Width of the Post Body" type="length" default="680px" value="680px"/>  
   
      /* =================================================  
       CSS Styling  
       ================================================= */  
       .post-body {  
        font: $(post.body.font);  
        color: $(post.body.color);  
        background-color: #ffffff;  
        padding: 5px 12px 8px 8px;  
        width:$(post.body.width);  
        -moz-border-radius: 5px;  
        border-radius: 5px;  
       }  
         
       #post-footer {  
        font: $(post.body.font);  
        font-size: 11px;  
        margin: 10px 0px 5px 1px;  
       }  
         
       .post-wrapper {  
        padding: 3px 10px 6px 9px;  
        background-color: #f6f7e8;  
        width: $(post.wrapper.width);  
        margin: 10px;  
        -moz-border-radius: 5px;  
        border-radius: 5px;  
       }  
         
       .post-wrapper a {  
        text-decoration: none;  
        color: #DE7104;  
       }  
         
       .post-title {  
        font: $(post.title.font);  
        font-size: 110%;  
        // font-weight: bold;  
        color: $(post.title.color);  
        margin: 5px 0px 9px 1px;  
       }  
         
       .post-title a {  
        color: $(post.title.color);  
        text-decoration: none;  
        display: block;  
       }  
         
       .post-title a:hover {  
        color: #545b10;  
       }  
     ]]>  
    </b:skin>  
  </head>  
  <body>  
   <b:section class='main' id='main' showaddelement='yes'>  
    <b:widget id='Blog1' locked='true' title='Blog Posts' type='Blog'>  
      
     <b:includable id='main' var='top'>  
      <script type='text/javascript'>   
       var postDate=&quot;&quot;;   
      </script>  
        
      <b:if cond='data:numPosts != 0'>  
       <b:loop values='data:posts' var='post'>  
        <div class="post-wrapper">  
         <b:include data='post' name='post'/>  
        </div>  
       </b:loop>  
      </b:if>  
     </b:includable>  
   
     <b:includable id='post' var='post'>  
      <a expr:name='data:post.id'/>  
        
      <!-- for the post title -->  
      <b:if cond='data:post.title'>  
       <div class="post-title">  
        <b:if cond='data:post.link'>  
         <a expr:href='data:post.link'>  
          <data:post.title/>  
         </a>  
        <b:else/>  
         <b:if cond='data:post.url'>  
          <b:if cond='data:blog.url != data:post.url'>  
           <a expr:href='data:post.url'>  
            <data:post.title/>  
           </a>  
          <b:else/>  
           <data:post.title/>  
          </b:if>  
         <b:else/>  
          <data:post.title/>  
         </b:if>  
        </b:if>  
       </div>  
      </b:if>  
   
      <!-- for the post body -->  
      <b:if cond='data:blog.metaDescription == &quot;&quot;'>  
       <!-- Then use the post body as the schema.org description,  
         for good G+/FB snippeting. -->  
       <div class='post-body' expr:id='&quot;post-body-&quot; + data:post.id' itemprop='description articleBody'>  
        <data:post.body/>  
       </div>  
      <b:else/>  
       <div class='post-body' expr:id='&quot;post-body-&quot; + data:post.id' itemprop='articleBody'>  
        <data:post.body/>  
       </div>  
      </b:if>  
   
      <!-- for the post footer -->  
      <div id="post-footer">  
         
       <!-- for the author -->  
       <div id="post-footer-author">  
        <b:if cond='data:top.showAuthor'>  
         <data:top.authorLabel/>  
          <b:if cond='data:post.authorProfileUrl'>  
           <span class='fn' itemprop='author' itemscope='itemscope' itemtype='http://schema.org/Person'>  
            <meta expr:content='data:post.authorProfileUrl' itemprop='url'/>  
            <a expr:href='data:post.authorProfileUrl' rel='author' title='author profile'>  
             <span itemprop='name'><data:post.author/></span>  
            </a>  
           </span>  
          <b:else/>  
           <span class='fn' itemprop='author' itemscope='itemscope' itemtype='http://schema.org/Person'>  
            <span itemprop='name'><data:post.author/></span>  
           </span>  
          </b:if>  
        </b:if>  
       </div>  
         
       <!-- for the post foorter time and date line -->  
       <div id="post-footer-timedate">  
        <b:if cond='data:top.showTimestamp'>  
         <data:top.timestampLabel/>  
         <b:if cond='data:post.url'>  
          <data:post.timestamp/>  
         </b:if>  
        </b:if>  
        on  
        <b:if cond='data:post.dateHeader'>  
         <data:post.dateHeader/>  
         <script type='text/javascript'>  
          postDate = &quot;<data:post.dateHeader/>&quot;;   
         </script>  
        <b:else/>  
         <script type='text/javascript'>  
          document.write(postDate);   
         </script>  
        </b:if>  
       </div>  
   
       <!-- for the post footer labels -->  
       <div id="post-footer-labels">  
        <b:if cond='data:post.labels'>  
         <data:postLabelsLabel/>  
         <b:loop values='data:post.labels' var='label'>  
          <a expr:href='data:label.url' rel='tag'><data:label.name/></a><b:if cond='data:label.isLast != &quot;true&quot;'>,</b:if>  
         </b:loop>  
        </b:if>    
       </div>  
         
      <!-- end of the post footer -->  
      </div>  
        
     </b:includable>  
   
    </b:widget>  
   </b:section>  
  </body>  
 </html>
  

References:
First CSS styling

In this post, I'm going to add some basic CSS styling to my Blogger template.When I'm done, I'll have a blog that looks like this:


Here's the template:
 <?xml version="1.0" encoding="UTF-8" ?>  
 <!DOCTYPE html>  
 <html   
  b:version='2'   
  class='v2'   
  expr:dir='data:blog.languageDirection'   
  xmlns='http://www.w3.org/1999/xhtml'   
  xmlns:b='http://www.google.com/2005/gml/b'   
  xmlns:data='http://www.google.com/2005/gml/data'   
  xmlns:expr='http://www.google.com/2005/gml/expr'  
 >  
  <head>  
   <link href='http://fonts.googleapis.com/css?family=Marcellus' rel='stylesheet' type='text/css'></link>  
   <meta content='IE=EmulateIE7' http-equiv='X-UA-Compatible'/>  
    <b:skin>  
     <![CDATA[  
     /*  
     -----------------------------------------------  
     ----------------------------------------------- */  
     /* =================================================  
       CSS Styling  
       ================================================= */  
       .post-wrapper {  
        padding: 3px 0px 6px 9px;  
        background-color: #f6f7e8;  
        width: 450px;  
        margin: 10px;  
        -moz-border-radius: 5px;  
        border-radius: 5px;  
       }  
       .post-title {  
        color: #a9b620;  
        font-family: 'Marcellus', serif;  
       }  
       .post-title a {  
        color: #a9b620;  
        text-decoration: none;  
        display: block;  
       }  
       .post-title a:hover {  
        color: #545b10;  
       }  
     ]]>  
    </b:skin>  
  </head>  
  <body>  
   <b:section class='main' id='main' showaddelement='yes'>  
    <b:widget id='Blog1' locked='true' title='Blog Posts' type='Blog'>  
    <b:includable id='main' var='top'>  
      <b:if cond='data:numPosts != 0'>  
       <b:loop values='data:posts' var='post'>  
        <div class="post-wrapper">  
         <b:include data='post' name='post'/>  
        </div>  
       </b:loop>  
      </b:if>  
     </b:includable>  
     <b:includable id='post' var='post'>  
      <a expr:name='data:post.id'/>  
      <b:if cond='data:post.title'>  
       <div class="post-title">  
        <b:if cond='data:post.link'>  
         <a expr:href='data:post.link'>  
          <data:post.title/>  
         </a>  
        <b:else/>  
         <b:if cond='data:post.url'>  
          <b:if cond='data:blog.url != data:post.url'>  
           <a expr:href='data:post.url'>  
            <data:post.title/>  
           </a>  
          <b:else/>  
           <data:post.title/>  
          </b:if>  
         <b:else/>  
          <data:post.title/>  
         </b:if>  
        </b:if>  
       </div>  
      </b:if>  
     </b:includable>  
    </b:widget>  
   </b:section>  
  </body>  
 </html>  
 

What did I add this time around?
  • Wrapped <b:include data='post' name='post'/> in a <div class="post-wrapper"> - used for styling each post (e.g., putting padding around the post).
  • Wrapped all of the conditional title stuff in a <div class="post-title"> - used for stying each title (e.g., changing removing link underlines, creating hover effect, etc.).
  • Added a link to the Marcellus Google font just below the <head> tag. See How to use Google's Font API with Blogger and Google web fonts. Note that bloggerbuster recommends making the <link> tag self closing. I used a closing tag instead. Just a preference.
  • Added CSS styling into the <b:skin> section. I'm not going to detail out how to do CSS or what these codes mean. I'll leave that to you.
And that's it! In the next post, I'm going to add some more detail to the post includable.

Wednesday, February 27, 2013

A Slight Expansion on the Bare Bones Blogger Template

In the last post, I created a very bare-bones Blogger template. While this may have been a little interesting, because it stripped the template down to its bare essence, it didn't show us much about what was going on under the hood because it used the magical 
    <b:section class='main' id='main' showaddelement='yes'>
      <b:widget id='Blog1' locked='true' title='Blog Posts' type='Blog'/>
    </b:section>
code to get the Blog widget to show up. Let's start unpacking that magic a little bit.

At the end of this post, I'll have a blog that includes only the title lines from my blog posts. They will be in-line because there will be no styling that causes them to break onto separate lines. It'll looks likes this:


Here's the template that produces the above blog:
    
<?xml version="1.0" encoding="UTF-8" ?>
<!DOCTYPE html>
<html 
  b:version='2' 
  class='v2' 
  expr:dir='data:blog.languageDirection' 
  xmlns='http://www.w3.org/1999/xhtml' 
  xmlns:b='http://www.google.com/2005/gml/b' 
  xmlns:data='http://www.google.com/2005/gml/data' 
  xmlns:expr='http://www.google.com/2005/gml/expr'
>
  <head>
    <meta content='IE=EmulateIE7' http-equiv='X-UA-Compatible'/>
      <b:skin>
        <![CDATA[
        /*
        -----------------------------------------------

        ----------------------------------------------- */
        
        ]]>
      </b:skin>
  </head>
  <body>
    <b:section class='main' id='main' showaddelement='yes'>
      <b:widget id='Blog1' locked='true' title='Blog Posts' type='Blog'>
        <b:includable id='main' var='top'>
            <b:if cond='data:numPosts != 0'>
              <b:loop values='data:posts' var='post'>
                  <b:include data='post' name='post'/>
              </b:loop>
            </b:if>
        </b:includable>
        <b:includable id='post' var='post'>
          <a expr:name='data:post.id'/>
          <b:if cond='data:post.title'>
            <b:if cond='data:post.link'>
              <a expr:href='data:post.link'>
                <data:post.title/>
              </a>
            <b:else/>
              <b:if cond='data:post.url'>
                <b:if cond='data:blog.url != data:post.url'>
                  <a expr:href='data:post.url'>
                    <data:post.title/>
                  </a>
                <b:else/>
                  <data:post.title/>
                </b:if>
              <b:else/>
                <data:post.title/>
              </b:if>
            </b:if>
          </b:if>
        </b:includable>
      </b:widget>
    </b:section>
  </body>
</html>
What's notable in this version?

As mentioned above, before the blog widget was included in a self-closing form:

    <b:section class='main' id='main' showaddelement='yes'>
      <b:widget id='Blog1' locked='true' title='Blog Posts' type='Blog'/>
    </b:section>

Now, the blog widget uses a opening and closing tag that allows a lot of coding goo to be inserted.
    <b:section class='main' id='main' showaddelement='yes'>
      <b:widget id='Blog1' locked='true' title='Blog Posts' type='Blog'>
        <!-- a lot of coding goo will go here... -->
      </b:widget>
    </b:section>

The next thing to notice that the Blog widget now has two children elements, both of which are 'includables':
    <b:section class='main' id='main' showaddelement='yes'>
      <b:widget id='Blog1' locked='true' title='Blog Posts' type='Blog'>
        <b:includable id='main' var='top'>
          <!-- includable code goes here -->
        </b:includable>
        <b:includable id='post' var='post'>
          <!--includable code goes here  -->
        </b:includable>
      </b:widget>
    </b:section>

According to the Blogger Help, "Widget content is contained in 'includable' sections". Check out the Blogger Help to learn more.

If we look at the main includable, we see:

        <b:includable id='main' var='top'>
          <!-- test to see if there are any posts -->
          <b:if cond='data:numPosts != 0'>
            <!-- loop to process each post -->
            <b:loop values='data:posts' var='post'>
                <!-- inserts an instance of the 'post' includable using the current post -->
                <b:include data='post' name='post'/>
            </b:loop>
          </b:if>
        </b:includable>

As indicated in the code comments, there is first a test to see if there are any posts. Then, there is a loop to process the posts. Finally, within the loop, an individual post is inserted using the post includable. So, let's look at the post includable.

     <b:includable id='post' var='post'>  
      <a expr:name='data:post.id'/>  
      <b:if cond='data:post.title'>  
       <b:if cond='data:post.link'>  
        <a expr:href='data:post.link'>  
         <data:post.title/>  
        </a>  
       <b:else/>  
        <b:if cond='data:post.url'>  
         <b:if cond='data:blog.url != data:post.url'>  
          <a expr:href='data:post.url'>  
           <data:post.title/>  
          </a>  
         <b:else/>  
          <data:post.title/>  
         </b:if>  
        <b:else/>  
         <data:post.title/>  
        </b:if>  
       </b:if>  
      </b:if>  
     </b:includable> 

A number of interesting things going on here:
  • Most of this is logic to determine (a) whether the title gets presented as a link or not and (b) where the link (if used) points to.
  • We start to see the use of data from the post. These are things like post.id, post.link, post.url and so on. To see all the data that's available to you, look at Blogger's Layouts Data Tags help.
  • In some instances, the title is wrapped in an <a> link. An expr is used (expr:href='data:post.link' or expr:href='data:post.url') to give the correct href link text. 
At this point, I have a basic blog with a listing of my post titles. It bugs me that they're all on one line and I'd like the links to be prettier. So, in my next post I'm going to do some formatting.

The Simplest Possible Template

I like to start from the very beginning. So, I wanted to start my template experimentation with a very, very basic template. Following is what I started with.


I was able to copy-and-paste this directly into Notepad++, save as an XML file, and upload to Blogger using the Backup / Restore button (upper right hand corner on the Template page) and it worked for me.

I think this bare-bones template is helpful because it lets you see the basic structure of a Blogger template:
  • There is an HTML element that contains two child elements - <head> and <body>. The opening HTML tag has a series of required attributes. You should just copy-and-paste these directly. It's not very important to know exactly what these are. 
  • The <head> element contains two elements - a <meta> element and a <b:skin> element. You won't have to worry about the <meta> element for a while. The <b:skin> element is where variables and CSS styling will eventually go - but I'll get into that in another post. 
  • The <body> element has one child - <b:section>. Every Blogger template MUST have at least one <b:section> element.
  • The <section> element has one child - <b:widget>. The widget, in this case, is a Blog widget (as indicated by type='Blog').
And with that, we have a very simple Blogger template. 

Blogger Templates Introduction

I recently decided to start blogging. After some brief research, I settled on the Blogger platform. 

I'm a bit of an "under the hood" kind of guy. I've coded a fair bit in Ruby on Rails and have ended up becoming proficient in ruby, the rails framework, javascript, CSS/SCSS, HTML, RSpec, BDD, and I don't know what else. I've also coded in VBA, Objective-C and a wee bit in C# a long time ago. So, naturally, I instantly wanted to start doing more customization that is possible via the normal dashboard. 

Apparently, like many people, I started Googling around for how-to's and reference information only to discover the documentation pretty much stinks. There are a couple of good posts out there (I'll put references in later). But, I thought I'd post my own experiences to see if I couldn't be helpful to someone else. 

So, that's what this is all about. My intention is to write a series of well-structured posts. But, I don't want to over think it. So, I'm going to just start posting and then clean up and refine as I go. 

For reference, I'm working in Windows 7 running on a MacBook Pro. I do my template editing using Notepad++. 


If you find this and have feedback, please drop a note. Thanks.

Thursday, February 14, 2013

Valentine's Day Cake

So, I made my mom's famous Valentine's Cake this year for the family:


Yummy!

Here's how you can do it, too.

You're going to need:
  • 1 chocolate cake box mix (and the ingredients the cake box calls for)
  • 1 - 8" square cake pan
  • 1 - 8" round cake pan
  • 1 can cherry pie filling
  • 1 recipe whippy creamy icing
  • Pastry bag and piping tips
A nice plate to put your finished cake on


Prepare the cake mix following the directions on the box. Pour into the square and round cake pans to an even level. Bake according to instructions (you may need to improvise a little since the cake box is unlikely to have instructions for 8" pans). After baking, remove from pans as instructed on box and cool on wire racks.


While cakes are baking, make the whippy creamy icing.

Put the square cake on your plate. Cut the round cake in half and put each half on adjacent sides of the square to make the heart shape.

Ice the cake. Pipe on some nice decorations, making sure to have a high lip at the edge to keep the cherries on.

Refrigerate so that the icing sets.

Spoon cherry pie filling onto top of cake.

And there you have it! Enjoy...

Friday, February 8, 2013

Thollem McDonas

Thollem came and played at the Transfiguration Episcopal Church music series. It was magical!