Tuesday, March 12, 2013

Accessing EventBase Attributes Directly

This post is one in a series on how I achieved composite classes and multi-table inheritance. For background, see Composite classes and multi-table inheritance. The last post in the series was Mixin Validations.

For proper attribution, I'll note that a whole lot of the code in this post came directly from or was inspired by Multiple Table Inheritance with ActiveRecord.

In this post, I will show how to make EventBase attributes directly accessible from any class that calls acts_as_event (in my case, Event and Trip).

The Test

So, I start out by writing the test I want to be able to pass:
require 'spec_helper'

describe Trip do
  describe "responds to" do
  end
  
  describe "functions properly" do
    it "  - saves EventBase correctly" do
      tcount_before = Trip.find(:all).count
      ebcount_before = EventBase.find(:all).count
      @t = Trip.create
      tid = @t.id
      @t.respond_to?("event_base").should be_true
      @t.save.should be_false
      @t.event_base.description = "test description"
      @t.save.should be_true
      @dbt = Trip.find(@t.id)
      @dbt.event_base.description.should == "test description"
      Trip.find(:all).count.should == tcount_before + 1
      EventBase.find(:all).count.should == ebcount_before + 1
      @dbt.destroy
      Trip.find(:all).count.should == tcount_before
      EventBase.find(:all).count.should == ebcount_before
    end
    
    it "  - can access attributes correctly" do
      @t = Trip.create
      @t.description = "test description"
      @t.save.should be_true
      @dbt = Trip.find(@t.id)
      @dbt.description.should == "test description"
    end
  end
end
Here's what's new in the test:
  • I attempt to set the .description attribute directly on @t.
  • I attempt to save @t.
  • I retrieve the Trip record as @dbt
  • I attempt to read the .description attribute
When I run:
$ rspec trip_spec.rb --format documentation$ rspec trip_spec.rb --format documentation

I get:
Trip
  functions properly
    - saves EventBase correctly
    - can access attributes correctly (FAILED - 1)

Failures:

  1) Trip functions properly   - can access attributes correctly
     Failure/Error: @t.description = "test description"
     NoMethodError:
       undefined method `description=' for #
     # ./trip_spec.rb:39:in `block (3 levels) in '

Finished in 0.47995 seconds
2 examples, 1 failure

Oh no! The test fails. Well, yeah, of course. Because I haven't done anything yet to make the attributes directly accessible...

Adding in Method Missing

So, our clue on how to fix this lies in the error message. Specifically, it says NoMethodError: undefined method `description='

Naturally, Trip doesn't have a .description method. The .description method is defined in EventBase. So, basically, what we need to do is to send missing method calls along to EventBase.

I did this by adding the following to InstanceMethods within the ActsAsEvent module:
  module InstanceMethods
    def event_base_with_build
      event_base_without_build || build_event_base
    end

    def validate_event_base_properties
      unless event_base.valid?
        event_base.errors.each do |attr, message|
          errors.add(attr, message)
        end
      end
    end
    
    def method_missing(meth, *args, &blk)
      event_base.send(meth, *args, &blk)
    rescue NoMethodError
      super
    end

  end # InstanceMethods

Now when I run:
$ rspec trip_spec.rb --format documentation

I get:
Trip
  functions properly
    - saves EventBase correctly
    - can access attributes correctly

Finished in 0.49288 seconds
2 examples, 0 failures

Success!

Mixin Validations

This post is one in a series on how I achieved composite classes and multi-table inheritance. For background, see Composite classes and multi-table inheritance. The last post in the series was First Cut at ActsAsEvent Module.

For proper attribution, I'll note that a whole lot of the code in this post came directly from or was inspired by Multiple Table Inheritance with ActiveRecord.

In this post, I want to show how a validation defined in the ActsAsEvent module can be enforced in any class that includes ActsAsEvent.

Delegate Validation to EventBase

In my EventBase class definition, I have a validation for description:
class EventBase < ActiveRecord::Base
  
  # ==========================================================================================
  #  Validations
  # ==========================================================================================  
    validates_presence_of :description

  # ==========================================================================================
  #  Associations
  # ==========================================================================================  
    belongs_to  :recur_rule, 
                dependent: :destroy  
    belongs_to  :eventable, polymorphic: true, dependent: :destroy
                
end

Getting classes that act_as_event to respect this validation is actually pretty straight forward. I updated my ActsAsEvent module like this:
module ActsAsEvent

  def acts_as_event
    class_eval do
      include InstanceMethods
      extend ClassMethods
      has_one :event_base, as: :eventable, :autosave => true, :dependent => :destroy
      validate :validate_event_base_properties
      alias_method_chain :event_base, :build
    end
  end
  
  module InstanceMethods
    def event_base_with_build
      event_base_without_build || build_event_base
    end

    def validate_event_base_properties
      unless event_base.valid?
        event_base.errors.each do |attr, message|
          errors.add(attr, message)
        end
      end
    end
  end # InstanceMethods

  module ClassMethods
  end # ClassMethods
    
end

ActiveRecord::Base.extend ActsAsEvent

Within the class_eval block, I added validate :validate_event_base_properties. This causes validate_event_base_properties to be called during an attempt to save. Then, I added the validate_event_base_properties instance method. Now, when the composing class (Event or Trip) tries to save, the EventBase validations are called (and enforced).

Running the Test

So, I have a test from my previous post that failed:
require 'spec_helper'

describe Trip do
  describe "responds to" do
  end
  
  describe "functions properly" do
    it "  - saves EventBase correctly" do
      tcount_before = Trip.find(:all).count
      ebcount_before = EventBase.find(:all).count
      @t = Trip.create
      tid = @t.id
      @t.respond_to?("event_base").should be_true
      @t.save.should be_false
      @t.event_base.description = "test description"
      @t.save.should be_true
      @dbt = Trip.find(@t.id)
      @dbt.event_base.description.should == "test description"
      Trip.find(:all).count.should == tcount_before + 1
      EventBase.find(:all).count.should == ebcount_before + 1
      @dbt.destroy
      Trip.find(:all).count.should == tcount_before
      EventBase.find(:all).count.should == ebcount_before
    end
  end
end

Now, when I run:
$ rspec trip_spec.rb --format documentation

I get:
Trip
  functions properly
    - saves EventBase correctly

Finished in 0.48657 seconds
1 example, 0 failures

Success! @t.save.should be_false now passes because the save fails (because description is not set). Then, when description is set, @t.save.should be_true now passes.

Next:


First Cut at ActsAsEvent Module

This post is one in a series on how I achieved composite classes and multi-table inheritance. For background, see Composite classes and multi-table inheritance. The last post in the series was Create EventBase.
For proper attribution, I'll note that a whole lot of the code in this post came directly from or was inspired by Multiple Table Inheritance with ActiveRecord.
 
In this post, I'm going to be taking a first cut at the ActsAsEvent module. If you don't know what modules are or how to create and use them, do some Googling.

Including Your Modules

One thing to remember is that you have to require your modules in order for Rails to find them correctly. In my config/initializers file, I include the line:
Dir[File.join(Rails.root, "lib", "*.rb")].each {|l| require l }

which causes all files in my lib directory ending in .rb to be required.

The Basic ActsAsEvent Module

In my lib directory, I created an acts_as_event.rb file for my ActsAsEvent module. I edited the file to create a basic module structure:

module ActsAsEvent
  def acts_as_event
    class_eval do
      include InstanceMethods
      extend ClassMethods
    end
  end
  
  module InstanceMethods
  end # InstanceMethods

  module ClassMethods
  end # ClassMethods
end

ActiveRecord::Base.extend ActsAsEvent

At this point, the module includes one method declaration (acts_as_event) and two module declarations (InstanceMethods and ClassMethods).

The class_eval block (within acts_as_event) is a metaprogramming construct that allows anything defined in the  block to be included in another class as if it had been defined in that class. Within this block, I included the include InstanceMethod and extend ClassMethods lines which cause any class that calls acts_as_event to include and extend the instance and class methods (respectively).

To the acts_as_event method, I added two lines:
  def acts_as_event
    class_eval do
      include InstanceMethods
      extend ClassMethods
      has_one :event_base, as: :eventable, :autosave => true, :dependent => :destroy
      alias_method_chain :event_base, :build
    end
  end

The has_one :event_base line creates an association between any class calling the acts_as_event method and the EventBase class that I created in a previous post. If you are unfamiliar with Rails associations, see A Guide to ActiveRecord Associations.

The alias_method_chain :event_base, :build line ensures that an EventBase record is created each time the composing object (in my case, Event or Trip) is created. This line calls an event_base_with_build instance method which I declared as:
  module InstanceMethods
    def event_base_with_build
      event_base_without_build || build_event_base
    end
  end # InstanceMethods

Mix the Method Into the Trip Class

Finally, I call the acts_as_event method (that I defined in the ActsAsEvent module) from within my Trip class:
class Trip < ActiveRecord::Base
# ==========================================================================================
#  Mixins
# ==========================================================================================
  acts_as_event

end

When I call acts_as_events, it causes the class_eval block to be called which in turn 'mixes in' everything within that block.

Testing the Mixed In Module

At this point, I should have a functioning mixed in module. So, I wrote a simple test in spec/models/trip_spec.rb:
require 'spec_helper'

describe Trip do
  describe "functions properly" do
    it "  - saves EventBase correctly" do
      tcount_before = Trip.find(:all).count
      ebcount_before = EventBase.find(:all).count
      @t = Trip.create
      tid = @t.id
      @t.respond_to?("event_base").should be_true
      @t.event_base.description = "test description"
      @t.save.should be_true
      @t = nil
      @dbt = Trip.find(tid)
      @dbt.event_base.description.should == "test description"
      Trip.find(:all).count.should == tcount_before + 1
      EventBase.find(:all).count.should == ebcount_before + 1
      @dbt.destroy
      Trip.find(:all).count.should == tcount_before
      EventBase.find(:all).count.should == ebcount_before
    end
  end
end

Here's what's going on in the test:
  • To begin, I record how many Trip and EventBase records there are in the database.
  • Then, I create a new Trip record and save its ID to tid.
  • I check that the new Trip responds to "event_base" - making sure the association is working correctly.
  • Then, I assign a description to the EventBase associated with the Trip.
  • And make sure it saves correctly. To be sure the save works, I set @t to nil and then retrieve the record from the database using tid.
  • Next, I make sure the record counts make sense.
  • Then, I destroy the record I just created.
  • And, again, make sure the record counts make sense.
  At the console, I ran:
$ rspec trip_spec.rb --format documentation

And I got:
Trip
  functions properly
    - saves EventBase correctly

Finished in 0.30754 seconds
1 example, 0 failures

Right on! It works.

Next Up: Mixin Validations

So far, this seems pretty good. But, there's a problem lurking in here. I want to be able to have EventBase validations so that my classes (Event and Trip) only save if my EventBase validations pass. So, let's say I add a validation to EventBase that ensures that there is a description, like this:
class EventBase < ActiveRecord::Base

  # ==========================================================================================
  #  Validations
  # ==========================================================================================  
    validates_presence_of :description

  # ==========================================================================================
  #  Associations
  # ==========================================================================================  
    belongs_to  :recur_rule, 
                dependent: :destroy  
    belongs_to  :eventable, polymorphic: true, dependent: :destroy
end

And, I update my test like this:
require 'spec_helper'

describe Trip do
  describe "responds to" do
  end
  
  describe "functions properly" do
    it "  - saves EventBase correctly" do
      tcount_before = Trip.find(:all).count
      ebcount_before = EventBase.find(:all).count
      @t = Trip.create
      tid = @t.id
      @t.respond_to?("event_base").should be_true
      @t.save.should be_false
      @t.event_base.description = "test description"
      @t.save.should be_true
      @dbt = Trip.find(@t.id)
      @dbt.event_base.description.should == "test description"
      Trip.find(:all).count.should == tcount_before + 1
      EventBase.find(:all).count.should == ebcount_before + 1
      @dbt.destroy
      Trip.find(:all).count.should == tcount_before
      EventBase.find(:all).count.should == ebcount_before
    end
  end
end

Note the line that says @t.save.should be_false. This says that my save should fail because event_base.description is nil. When I run:
$ rspec trip_spec.rb --format documentation

I get:
Trip
  functions properly
    - saves EventBase correctly (FAILED - 1)

Failures:

  1) Trip functions properly   - saves EventBase correctly
     Failure/Error: @t.save.should be_false
       expected: false value
            got: true
     # ./trip_spec.rb:25:in `block (3 levels) in <top (required)>'

Finished in 0.08088 seconds
1 example, 1 failure

Oh no! @t is saving even though the validation condition is not met. I'll fix this in the next post - Mixin Validations.

Create EventBase

This post is one in a series on how I achieved composite classes and multi-table inheritance. For background, see Composite classes and multi-table inheritance.

For proper attribution, I'll note that a whole lot of the code in this post came directly from or was inspired by Multiple Table Inheritance with ActiveRecord.

In this post, I'm going to describe how I created the EventBase model.

Create the EventBase model

In the command window, I typed:
$ rails g model EventBase

Which output something like:
      invoke  active_record
      create    db/migrate/20130312011851_create_event_bases.rb
      create    app/models/event_base.rb
      invoke    rspec
      create      spec/models/event_base_spec.rb
      invoke      factory_girl
      create        spec/factories/event_bases.rb

Edit and Run the Migration to Create Database Tables for EventBase

I then opened the EventBase migration and edited it:
class CreateEventBases < ActiveRecord::Migration
  def change
    create_table :event_bases do |t|
      t.string      :summary
      t.string      :description
      t.datetime    :start_datetime
      t.datetime    :end_datetime
      t.integer     :recur_rule_id
      t.integer     :eventable_id
      t.string      :eventable_type
      t.timestamps
    end
  end
end 

It's probably worth noting :eventable_id and :eventable_type. Eventually, I am going to create a polymorphic association between EventBase and the classes that I want to inherit from EventBase. These two column will allow specific instances of EventBase to be associated with any other Class (in my case, Event and Trip).

Back at the command line, I ran the migration:
$ bundle exec rake db:migrate

Which gave me something like:
==  CreateEventBases: migrating ===============================================
-- create_table(:event_bases)
NOTICE:  CREATE TABLE will create implicit sequence "event_bases_id_seq" for serial column "event_bases.id"
NOTICE:  CREATE TABLE / PRIMARY KEY will create implicit index "event_bases_pkey" for table "event_bases"
   -> 0.0075s
==  CreateEventBases: migrated (0.0077s) ====================================== 

Then I opened event_base.rb and edited it:
class EventBase < ActiveRecord::Base
  
  # ==========================================================================================
  #  Associations
  # ==========================================================================================  
    belongs_to  :eventable, polymorphic: true, dependent: :destroy
                
end

'Eventable' is going to be any class that can act as an event.

At this point, I should have a basic EventBase model working. So, I wrote a simple test:

require 'spec_helper'

describe EventBase do
  describe "respond_to" do
    it "  - new" do
      @eb = EventBase.new
      @eb.respond_to?("description").should  be_true
      @eb.description = "test description"
      @eb.save.should be_true
      @eb.description.should == "test description"
    end
  end
end 

In my spec/models directory, I ran:
$ rspec event_base_spec.rb --format documentation

And I got:
EventBase
  respond_to
    - new

Finished in 0.12013 seconds
1 example, 0 failures

Super! It works. Next up: First Cut of the ActsAsEvent module.

Composite classes and multi-table inheritance

I'm working on a project where I have a set of classes that have (a) common data and behavior and (b) distinct data and behavior. At first glance, it would seem that inheritance is the thing to do here. But, for a number of reasons (Google "composition over inheritance"), I preferred to go down the composition route.

I Googled "Multi Table Inheritance" (MTI) since this seemed to be the key phrase for getting composition to work and found a couple of really helpful posts. In particular, Multiple Table Inheritance with ActiveRecord was a real gem!In fact, just about all the code in these post either came directly from this post or was directly inspired by it.


They were a bit terse, and I thought it might be helpful to provide a longer, blow-by-blow account of how I got my composition and MTI working.

In this example, I have two classes that I want to have shared data structures and behavior. They are: Event and Trip. To accomplish this, I am going to create a third class, called EventBase, that will contain the shared data structures and behavior. I will then include EventBase (by way of composition) in each of Event and Trip so that they can have the desired data structures and behaviors.

Next Post: Create EventBase


References:

Multiple Table Inheritance with ActiveRecord
Multiple Table Inheritance in Rails 3

Friday, March 1, 2013

exandable comments with javascript

Overview

At the end of my last iteration, I had a blog that looked like this:


Note that the second post indicates that there is one comment (and the '1 comment' text is a clickable link). When I'm done with this iteration, the user will be able to click a 'show' link that will display the comments:

[ screen shot of comments displayed ]

Note that there is now a 'hide' link. If the user clicks this, then the comments are hidden.

First thing, I wrapped all the posts in a div with id="posts". I'm going to use this later (in my javascript) to determine if the page that's loading has any posts on it.
       <div id="posts">  
        <b:loop values='data:posts' var='post'>  
         <b:include data='post' name='post'/>  
        </b:loop>  
       </div>  
Next, I created a stub javascript function that will execute once the page has finished loading. I use this function to insert comments into posts (where they exist). I needed to go this route, because post.comments is only available if I'm on an item page - not if I'm on the home page (see the Blog Posts section of Layouts Data Tags on Blogger Help).
          window.onload = function () 
          { 
            var postDiv = document.getElementById("posts")
            if (postDiv)
            {
              
            }
          }
Add post.id into post wrapper:
<div class="post-wrapper" expr:data-post-id='data:post.id'>  

Refactoring and javascript setup

Overview

In this iteration, I do a little refactoring and set up for adding javascript in later iterations. I'll discuss the refactoring and javascript set up separately. Oh, yeah. And I also set a background image. That's discussed below, too.

Refactoring

The refactoring was basically about breaking up long includables into smaller includables that could be re-assembled into the larger elements. I found that my post includable was getting very long with a lot of different things going on inside it for the various post components. My preference is to have smaller blocks of code that do essentially only one thing (like insert the timedate line in the footer) so that I can focus on one small thing at a time. 

So, this:
     <b:includable id='post' var='post'>  
      <a expr:name='data:post.id'/>  
        
      <!-- for the post title -->  
      <b:if cond='data:post.title'>  
       <div class="post-title">  
        <b:if cond='data:post.link'>  
         <a expr:href='data:post.link'>  
          <data:post.title/>  
         </a>  
        <b:else/>  
         <b:if cond='data:post.url'>  
          <b:if cond='data:blog.url != data:post.url'>  
           <a expr:href='data:post.url'>  
            <data:post.title/>  
           </a>  
          <b:else/>  
           <data:post.title/>  
          </b:if>  
         <b:else/>  
          <data:post.title/>  
         </b:if>  
        </b:if>  
       </div>  
      </b:if>  
   
      <!-- for the post body -->  
      <b:if cond='data:blog.metaDescription == &quot;&quot;'>  
       <!-- Then use the post body as the schema.org description,  
         for good G+/FB snippeting. -->  
       <div class='post-body' expr:id='&quot;post-body-&quot; + data:post.id' itemprop='description articleBody'>  
        <data:post.body/>  
       </div>  
      <b:else/>  
       <div class='post-body' expr:id='&quot;post-body-&quot; + data:post.id' itemprop='articleBody'>  
        <data:post.body/>  
       </div>  
      </b:if>  
   
      <!-- for the post footer -->  
      <div id="post-footer">  
         
       <!-- for the author -->  
       <div id="post-footer-author">  
        <b:if cond='data:top.showAuthor'>  
         <data:top.authorLabel/>  
          <b:if cond='data:post.authorProfileUrl'>  
           <span class='fn' itemprop='author' itemscope='itemscope' itemtype='http://schema.org/Person'>  
            <meta expr:content='data:post.authorProfileUrl' itemprop='url'/>  
            <a expr:href='data:post.authorProfileUrl' rel='author' title='author profile'>  
             <span itemprop='name'><data:post.author/></span>  
            </a>  
           </span>  
          <b:else/>  
           <span class='fn' itemprop='author' itemscope='itemscope' itemtype='http://schema.org/Person'>  
            <span itemprop='name'><data:post.author/></span>  
           </span>  
          </b:if>  
        </b:if>  
       </div>  
         
       <!-- for the post footer time and date line -->  
       <div id="post-footer-timedate">  
        <b:if cond='data:top.showTimestamp'>  
         <data:top.timestampLabel/>  
         <b:if cond='data:post.url'>  
          <data:post.timestamp/>  
         </b:if>  
        </b:if>  
        on  
        <b:if cond='data:post.dateHeader'>  
         <data:post.dateHeader/>  
         <script type='text/javascript'>  
          postDate = &quot;<data:post.dateHeader/>&quot;;   
         </script>  
        <b:else/>  
         <script type='text/javascript'>  
          document.write(postDate);   
         </script>  
        </b:if>  
       </div>  
   
       <!-- for the post footer labels -->  
       <div id="post-footer-labels">  
        <b:if cond='data:post.labels'>  
         <data:postLabelsLabel/>  
         <b:loop values='data:post.labels' var='label'>  
          <a expr:href='data:label.url' rel='tag'><data:label.name/></a><b:if cond='data:label.isLast != &quot;true&quot;'>,</b:if>  
         </b:loop>  
        </b:if>    
       </div>  
         
      <!-- end of the post footer -->  
      </div>  
        
     </b:includable>  

Became this:
     <!-- post includable -->  
     <b:includable id='post' var='post'>  
      <a expr:name='data:post.id'/>  
      <b:include name='post-title' data='post'/>  
      <b:include name='post-body' data='post'/>  
      <b:include data='post' name='post-footer'/>  
     </b:includable>  

With the components being defined in their own includables like this:
     <!-- post-title includable -->  
     <b:includable id='post-title' var='post'>  
      <b:if cond='data:post.title'>  
       <div class="post-title">  
        <b:if cond='data:post.link'>  
         <a expr:href='data:post.link'>  
          <data:post.title/>  
         </a>  
        <b:else/>  
         <b:if cond='data:post.url'>  
          <b:if cond='data:blog.url != data:post.url'>  
           <a expr:href='data:post.url'>  
            <data:post.title/>  
           </a>  
          <b:else/>  
           <data:post.title/>  
          </b:if>  
         <b:else/>  
          <data:post.title/>  
         </b:if>  
        </b:if>  
       </div>  
      </b:if>      
     </b:includable>  

I don't know about you, but I find that a lot nicer! My includables fit on a single screen and I can think about and work on things without having to scroll around. 

javascript setup

I also set up a place in the <head> section where I'm going to put all my javascript (at least that's my working hypothesis). From a previous post, I had also put a line of javascript in the middle of my code. So, I moved this up into my javascript section. And, I created a little dummy javascript function (called 'alertBox') so that I could verify that this setup worked.

Here's what the javascript section in the <head> looks like:

   <script type='text/javascript'>  
       
     var postDate=&quot;&quot;;  
       
     //<![CDATA[  
      
      function alertBox()  
      {  
       alert("I am an alert box!");  
      }  
   
     //]]>  
    </script>  

And I set up the post-footer-comments includable to use the javascript function:
     <!-- post-footer-comments includable -->  
     <b:includable id='post-footer-comments' var='post'>  
      <b:if cond='data:post.numComments > 0'>  
       <a href="javascript:void(0)" onclick="alertBox();">  
        <data:post.commentLabelFull/>  
       </a>  
      </b:if>      
     </b:includable>  

And, it worked!

Background Image

Just because I was futzing around, I decided to include a background image for my blog. This was accomplished in the CSS section:
       body {  
        background:url(http://backgroundfull.com/images/1654-image-green-background-ground-wallpaper-back-344641.jpg) no-repeat;  
        background-attachment: fixed;  
       }  

Template Code

Here's what the template looks like after refactoring and javascript setup:

 <?xml version="1.0" encoding="UTF-8" ?>  
 <!DOCTYPE html>  
 <html   
  b:version='2'   
  class='v2'   
  expr:dir='data:blog.languageDirection'   
  xmlns='http://www.w3.org/1999/xhtml'   
  xmlns:b='http://www.google.com/2005/gml/b'   
  xmlns:data='http://www.google.com/2005/gml/data'   
  xmlns:expr='http://www.google.com/2005/gml/expr'  
 >  
  <head>  
   <link href='http://fonts.googleapis.com/css?family=Bitter' rel='stylesheet' type='text/css'></link>  
   <link href='http://fonts.googleapis.com/css?family=Marcellus' rel='stylesheet' type='text/css'></link>  
   <link href='http://fonts.googleapis.com/css?family=Molengo' rel='stylesheet' type='text/css'></link>  
   <link href='http://fonts.googleapis.com/css?family=Oxygen' rel='stylesheet' type='text/css'></link>  
   <link href='http://fonts.googleapis.com/css?family=Quando' rel='stylesheet' type='text/css'></link>  
   <link href='http://fonts.googleapis.com/css?family=Roboto' rel='stylesheet' type='text/css'></link>  
   <link href='http://fonts.googleapis.com/css?family=Roboto+Condensed:300' rel='stylesheet' type='text/css'></link>  
   <meta content='IE=EmulateIE7' http-equiv='X-UA-Compatible'/>  
    <b:skin>  
     <![CDATA[  
     /*  
     -----------------------------------------------  
   
     ----------------------------------------------- */  
    /* Variable definitions  
     ====================  
   
      <Group description="Post" selector="body">  
       <Variable   
        name="post.title.font"   
        description="Font for Post Title"   
        type="font"  
        default="normal normal 13px Oxygen, sans-serif"   
        value="normal normal 13px Oxygen, sans-serif"/>  
       <Variable   
        name="post.body.font"   
        description="Font for Post Body"   
        type="font"  
        default="normal normal 12px/18px 'Oxygen', sans-serif"   
        value="normal normal 12px/18px 'Oxygen', sans-serif"/>  
       <Variable   
        name="post.title.color"   
        description="Post Title Color"   
        type="color" default="#4c2600"   
        value="#4c2600"/>  
       <Variable   
        name="post.body.color"   
        description="Text Color"   
        type="color"   
        default="#ffffff"   
        value="#495025"/>  
      </Group>  
   
      <Variable name="post.wrapper.width" description="Width of the Post Wrapper" type="length" default="700px" value="700px"/>  
      <Variable name="post.body.width" description="Width of the Post Body" type="length" default="680px" value="680px"/>  
   
      /* =================================================  
       CSS Styling  
       ================================================= */  
       body {  
        background:url(http://backgroundfull.com/images/1654-image-green-background-ground-wallpaper-back-344641.jpg) no-repeat;  
        background-attachment: fixed;  
       }  
   
       .post-body {  
        font: $(post.body.font);  
        color: $(post.body.color);  
        background-color: #ffffff;  
        padding: 5px 12px 8px 8px;  
        width:$(post.body.width);  
        -moz-border-radius: 5px;  
        border-radius: 5px;  
       }  
         
       #post-footer {  
        font: $(post.body.font);  
        font-size: 11px;  
        margin: 10px 0px 5px 1px;  
       }  
         
       .post-wrapper {  
        padding: 3px 10px 6px 9px;  
        background-color: #f6f7e8;  
        width: $(post.wrapper.width);  
        margin: 10px;  
        -moz-border-radius: 5px;  
        border-radius: 5px;  
       }  
         
       .post-wrapper a {  
        text-decoration: none;  
        color: #DE7104;  
       }  
         
       .post-title {  
        font: $(post.title.font);  
        font-size: 110%;  
        // font-weight: bold;  
        color: $(post.title.color);  
        margin: 5px 0px 9px 1px;  
       }  
         
       .post-title a {  
        color: $(post.title.color);  
        text-decoration: none;  
        display: block;  
       }  
         
       .post-title a:hover {  
        color: #545b10;  
       }  
     ]]>  
    </b:skin>  
    <script type='text/javascript'>  
       
     var postDate=&quot;&quot;;  
       
     //<![CDATA[  
      
      function alertBox()  
      {  
       alert("I am an alert box!");  
      }  
   
     //]]>  
    </script>  
  </head>  
  <body>  
   <b:section class='main' id='main' showaddelement='yes'>  
    <b:widget id='Blog1' locked='true' title='Blog Posts' type='Blog'>  
       
     <!-- main includable -->  
     <b:includable id='main' var='top'>  
      <b:if cond='data:numPosts != 0'>  
       <b:loop values='data:posts' var='post'>  
        <div class="post-wrapper">  
         <b:include data='post' name='post'/>  
        </div>  
       </b:loop>  
      </b:if>  
     </b:includable>  
   
     <!-- post includable -->  
     <b:includable id='post' var='post'>  
      <a expr:name='data:post.id'/>  
      <b:include name='post-title' data='post'/>  
      <b:include name='post-body' data='post'/>  
      <b:include data='post' name='post-footer'/>  
     </b:includable>  
       
     <!-- post-title includable -->  
     <b:includable id='post-title' var='post'>  
      <b:if cond='data:post.title'>  
       <div class="post-title">  
        <b:if cond='data:post.link'>  
         <a expr:href='data:post.link'>  
          <data:post.title/>  
         </a>  
        <b:else/>  
         <b:if cond='data:post.url'>  
          <b:if cond='data:blog.url != data:post.url'>  
           <a expr:href='data:post.url'>  
            <data:post.title/>  
           </a>  
          <b:else/>  
           <data:post.title/>  
          </b:if>  
         <b:else/>  
          <data:post.title/>  
         </b:if>  
        </b:if>  
       </div>  
      </b:if>      
     </b:includable>  
       
     <!-- post-body includable -->  
     <b:includable id='post-body' var='post'>  
      <b:if cond='data:blog.metaDescription == &quot;&quot;'>  
       <!-- Then use the post body as the schema.org description,  
         for good G+/FB snippeting. -->  
       <div class='post-body' expr:id='&quot;post-body-&quot; + data:post.id' itemprop='description articleBody'>  
        <data:post.body/>  
       </div>  
      <b:else/>  
       <div class='post-body' expr:id='&quot;post-body-&quot; + data:post.id' itemprop='articleBody'>  
        <data:post.body/>  
       </div>  
      </b:if>      
     </b:includable>  
       
     <!-- post-footer includable -->  
     <b:includable id='post-footer' var='post'>  
      <div id="post-footer">  
       <b:include name='post-footer-comments' data='post'/>  
       <b:include name='post-footer-author' data='post'/>  
       <b:include data='post' name='post-footer-timedate'/>  
       <b:include data='post' name='post-footer-labels'/>  
      </div>      
     </b:includable>  
       
     <!-- post-footer-comments includable -->  
     <b:includable id='post-footer-comments' var='post'>  
      <b:if cond='data:post.numComments > 0'>  
       <a href="javascript:void(0)" onclick="alertBox();">  
        <data:post.commentLabelFull/>  
       </a>  
      </b:if>      
     </b:includable>  
       
     <!-- post-footer-author includable -->  
     <b:includable id='post-footer-author' var='post'>  
      <div id="post-footer-author">  
       <b:if cond='data:top.showAuthor'>  
        <data:top.authorLabel/>  
         <b:if cond='data:post.authorProfileUrl'>  
          <span class='fn' itemprop='author' itemscope='itemscope' itemtype='http://schema.org/Person'>  
           <meta expr:content='data:post.authorProfileUrl' itemprop='url'/>  
           <a expr:href='data:post.authorProfileUrl' rel='author' title='author profile'>  
            <span itemprop='name'><data:post.author/></span>  
           </a>  
          </span>  
         <b:else/>  
          <span class='fn' itemprop='author' itemscope='itemscope' itemtype='http://schema.org/Person'>  
           <span itemprop='name'><data:post.author/></span>  
          </span>  
         </b:if>  
       </b:if>  
      </div>      
     </b:includable>  
       
     <!-- post-footer-timedate includable -->  
     <b:includable id='post-footer-timedate' var='post'>  
      <div id="post-footer-timedate">  
       <b:if cond='data:top.showTimestamp'>  
        On  
        <b:if cond='data:post.dateHeader'>  
         <data:post.dateHeader/>  
         <script type='text/javascript'>  
          postDate = &quot;<data:post.dateHeader/>&quot;;   
         </script>  
        <b:else/>  
         <script type='text/javascript'>  
          document.write(postDate);   
         </script>  
        </b:if>  
        <data:top.timestampLabel/>  
        <b:if cond='data:post.url'>  
         <data:post.timestamp/>  
        </b:if>  
       </b:if>  
      </div>       
     </b:includable>  
       
     <!-- post-footer-labels includable -->  
     <b:includable id='post-footer-labels' var='post'>  
      <div id="post-footer-labels">  
       <b:if cond='data:post.labels'>  
        <data:postLabelsLabel/>  
        <b:loop values='data:post.labels' var='label'>  
         <a expr:href='data:label.url' rel='tag'><data:label.name/></a><b:if cond='data:label.isLast != &quot;true&quot;'>,</b:if>  
        </b:loop>  
       </b:if>    
      </div>      
     </b:includable>  
   
    </b:widget>  
   </b:section>  
  </body>  
 </html>  

Thursday, February 28, 2013

Expanding the Post Content

Now it's time to expand the post content. In this iteration, I'm going to add the post body and a post footer. When finished, it will look like this:
 

Time and Date Stamp

Note that the time and date stamp (second line of the footer) includes the date stamp for every post. Often in Blogger templates, the posts are grouped by posting date. I opted not to have this sort of grouping. I picked up how to do this from this posting

You'll see that I added the recommended variable declaration at line 117:
      <script type='text/javascript'>   
       var postDate=&quot;&quot;;   
      </script>  

And then, the actual code to insert the posting date is on lines 200-209.
        <b:if cond='data:post.dateHeader'>  
         <data:post.dateHeader/>  
         <script type='text/javascript'>  
          postDate = &quot;<data:post.dateHeader/>&quot;;   
         </script>  
        <b:else/>  
         <script type='text/javascript'>  
          document.write(postDate);   
         </script>  
        </b:if>  
Basically, what this says is:
  1. If there is a dateHeader, then insert the dateHeader and assign the value to the previously-declared variable.
  2. Otherwise, insert the contents of the previously-declared variable.
Good stuff!


Template Code
 <?xml version="1.0" encoding="UTF-8" ?>  
 <!DOCTYPE html>  
 <html   
  b:version='2'   
  class='v2'   
  expr:dir='data:blog.languageDirection'   
  xmlns='http://www.w3.org/1999/xhtml'   
  xmlns:b='http://www.google.com/2005/gml/b'   
  xmlns:data='http://www.google.com/2005/gml/data'   
  xmlns:expr='http://www.google.com/2005/gml/expr'  
 >  
  <head>  
   <link href='http://fonts.googleapis.com/css?family=Bitter' rel='stylesheet' type='text/css'></link>  
   <link href='http://fonts.googleapis.com/css?family=Marcellus' rel='stylesheet' type='text/css'></link>  
   <link href='http://fonts.googleapis.com/css?family=Molengo' rel='stylesheet' type='text/css'></link>  
   <link href='http://fonts.googleapis.com/css?family=Oxygen' rel='stylesheet' type='text/css'></link>  
   <link href='http://fonts.googleapis.com/css?family=Quando' rel='stylesheet' type='text/css'></link>  
   <link href='http://fonts.googleapis.com/css?family=Roboto' rel='stylesheet' type='text/css'></link>  
   <link href='http://fonts.googleapis.com/css?family=Roboto+Condensed:300' rel='stylesheet' type='text/css'></link>  
   <meta content='IE=EmulateIE7' http-equiv='X-UA-Compatible'/>  
    <b:skin>  
     <![CDATA[  
     /*  
     -----------------------------------------------  
   
     ----------------------------------------------- */  
    /* Variable definitions  
     ====================  
   
      <Group description="Post" selector="body">  
       <Variable   
        name="post.title.font"   
        description="Font for Post Title"   
        type="font"  
        default="normal normal 13px Oxygen, sans-serif"   
        value="normal normal 13px Oxygen, sans-serif"/>  
       <Variable   
        name="post.body.font"   
        description="Font for Post Body"   
        type="font"  
        default="normal normal 12px/18px 'Oxygen', sans-serif"   
        value="normal normal 12px/18px 'Oxygen', sans-serif"/>  
       <Variable   
        name="post.title.color"   
        description="Post Title Color"   
        type="color" default="#4c2600"   
        value="#4c2600"/>  
       <Variable   
        name="post.body.color"   
        description="Text Color"   
        type="color"   
        default="#ffffff"   
        value="#495025"/>  
      </Group>  
   
      <Variable name="post.wrapper.width" description="Width of the Post Wrapper" type="length" default="700px" value="700px"/>  
      <Variable name="post.body.width" description="Width of the Post Body" type="length" default="680px" value="680px"/>  
   
      /* =================================================  
       CSS Styling  
       ================================================= */  
       .post-body {  
        font: $(post.body.font);  
        color: $(post.body.color);  
        background-color: #ffffff;  
        padding: 5px 12px 8px 8px;  
        width:$(post.body.width);  
        -moz-border-radius: 5px;  
        border-radius: 5px;  
       }  
         
       #post-footer {  
        font: $(post.body.font);  
        font-size: 11px;  
        margin: 10px 0px 5px 1px;  
       }  
         
       .post-wrapper {  
        padding: 3px 10px 6px 9px;  
        background-color: #f6f7e8;  
        width: $(post.wrapper.width);  
        margin: 10px;  
        -moz-border-radius: 5px;  
        border-radius: 5px;  
       }  
         
       .post-wrapper a {  
        text-decoration: none;  
        color: #DE7104;  
       }  
         
       .post-title {  
        font: $(post.title.font);  
        font-size: 110%;  
        // font-weight: bold;  
        color: $(post.title.color);  
        margin: 5px 0px 9px 1px;  
       }  
         
       .post-title a {  
        color: $(post.title.color);  
        text-decoration: none;  
        display: block;  
       }  
         
       .post-title a:hover {  
        color: #545b10;  
       }  
     ]]>  
    </b:skin>  
  </head>  
  <body>  
   <b:section class='main' id='main' showaddelement='yes'>  
    <b:widget id='Blog1' locked='true' title='Blog Posts' type='Blog'>  
      
     <b:includable id='main' var='top'>  
      <script type='text/javascript'>   
       var postDate=&quot;&quot;;   
      </script>  
        
      <b:if cond='data:numPosts != 0'>  
       <b:loop values='data:posts' var='post'>  
        <div class="post-wrapper">  
         <b:include data='post' name='post'/>  
        </div>  
       </b:loop>  
      </b:if>  
     </b:includable>  
   
     <b:includable id='post' var='post'>  
      <a expr:name='data:post.id'/>  
        
      <!-- for the post title -->  
      <b:if cond='data:post.title'>  
       <div class="post-title">  
        <b:if cond='data:post.link'>  
         <a expr:href='data:post.link'>  
          <data:post.title/>  
         </a>  
        <b:else/>  
         <b:if cond='data:post.url'>  
          <b:if cond='data:blog.url != data:post.url'>  
           <a expr:href='data:post.url'>  
            <data:post.title/>  
           </a>  
          <b:else/>  
           <data:post.title/>  
          </b:if>  
         <b:else/>  
          <data:post.title/>  
         </b:if>  
        </b:if>  
       </div>  
      </b:if>  
   
      <!-- for the post body -->  
      <b:if cond='data:blog.metaDescription == &quot;&quot;'>  
       <!-- Then use the post body as the schema.org description,  
         for good G+/FB snippeting. -->  
       <div class='post-body' expr:id='&quot;post-body-&quot; + data:post.id' itemprop='description articleBody'>  
        <data:post.body/>  
       </div>  
      <b:else/>  
       <div class='post-body' expr:id='&quot;post-body-&quot; + data:post.id' itemprop='articleBody'>  
        <data:post.body/>  
       </div>  
      </b:if>  
   
      <!-- for the post footer -->  
      <div id="post-footer">  
         
       <!-- for the author -->  
       <div id="post-footer-author">  
        <b:if cond='data:top.showAuthor'>  
         <data:top.authorLabel/>  
          <b:if cond='data:post.authorProfileUrl'>  
           <span class='fn' itemprop='author' itemscope='itemscope' itemtype='http://schema.org/Person'>  
            <meta expr:content='data:post.authorProfileUrl' itemprop='url'/>  
            <a expr:href='data:post.authorProfileUrl' rel='author' title='author profile'>  
             <span itemprop='name'><data:post.author/></span>  
            </a>  
           </span>  
          <b:else/>  
           <span class='fn' itemprop='author' itemscope='itemscope' itemtype='http://schema.org/Person'>  
            <span itemprop='name'><data:post.author/></span>  
           </span>  
          </b:if>  
        </b:if>  
       </div>  
         
       <!-- for the post foorter time and date line -->  
       <div id="post-footer-timedate">  
        <b:if cond='data:top.showTimestamp'>  
         <data:top.timestampLabel/>  
         <b:if cond='data:post.url'>  
          <data:post.timestamp/>  
         </b:if>  
        </b:if>  
        on  
        <b:if cond='data:post.dateHeader'>  
         <data:post.dateHeader/>  
         <script type='text/javascript'>  
          postDate = &quot;<data:post.dateHeader/>&quot;;   
         </script>  
        <b:else/>  
         <script type='text/javascript'>  
          document.write(postDate);   
         </script>  
        </b:if>  
       </div>  
   
       <!-- for the post footer labels -->  
       <div id="post-footer-labels">  
        <b:if cond='data:post.labels'>  
         <data:postLabelsLabel/>  
         <b:loop values='data:post.labels' var='label'>  
          <a expr:href='data:label.url' rel='tag'><data:label.name/></a><b:if cond='data:label.isLast != &quot;true&quot;'>,</b:if>  
         </b:loop>  
        </b:if>    
       </div>  
         
      <!-- end of the post footer -->  
      </div>  
        
     </b:includable>  
   
    </b:widget>  
   </b:section>  
  </body>  
 </html>
  

References:

First CSS styling

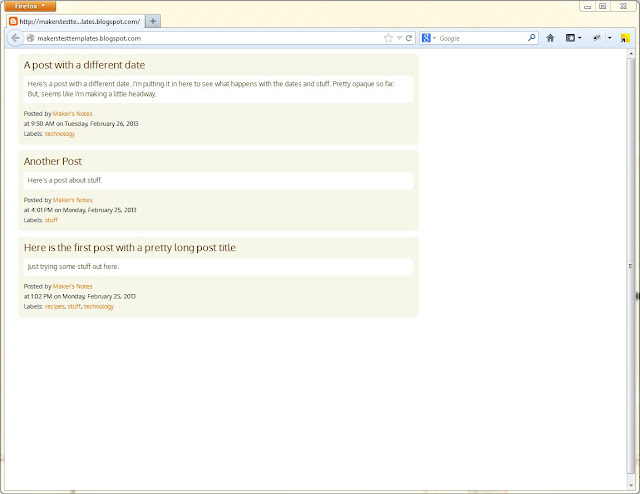
In this post, I'm going to add some basic CSS styling to my Blogger template.When I'm done, I'll have a blog that looks like this:


Here's the template:
 <?xml version="1.0" encoding="UTF-8" ?>  
 <!DOCTYPE html>  
 <html   
  b:version='2'   
  class='v2'   
  expr:dir='data:blog.languageDirection'   
  xmlns='http://www.w3.org/1999/xhtml'   
  xmlns:b='http://www.google.com/2005/gml/b'   
  xmlns:data='http://www.google.com/2005/gml/data'   
  xmlns:expr='http://www.google.com/2005/gml/expr'  
 >  
  <head>  
   <link href='http://fonts.googleapis.com/css?family=Marcellus' rel='stylesheet' type='text/css'></link>  
   <meta content='IE=EmulateIE7' http-equiv='X-UA-Compatible'/>  
    <b:skin>  
     <![CDATA[  
     /*  
     -----------------------------------------------  
     ----------------------------------------------- */  
     /* =================================================  
       CSS Styling  
       ================================================= */  
       .post-wrapper {  
        padding: 3px 0px 6px 9px;  
        background-color: #f6f7e8;  
        width: 450px;  
        margin: 10px;  
        -moz-border-radius: 5px;  
        border-radius: 5px;  
       }  
       .post-title {  
        color: #a9b620;  
        font-family: 'Marcellus', serif;  
       }  
       .post-title a {  
        color: #a9b620;  
        text-decoration: none;  
        display: block;  
       }  
       .post-title a:hover {  
        color: #545b10;  
       }  
     ]]>  
    </b:skin>  
  </head>  
  <body>  
   <b:section class='main' id='main' showaddelement='yes'>  
    <b:widget id='Blog1' locked='true' title='Blog Posts' type='Blog'>  
    <b:includable id='main' var='top'>  
      <b:if cond='data:numPosts != 0'>  
       <b:loop values='data:posts' var='post'>  
        <div class="post-wrapper">  
         <b:include data='post' name='post'/>  
        </div>  
       </b:loop>  
      </b:if>  
     </b:includable>  
     <b:includable id='post' var='post'>  
      <a expr:name='data:post.id'/>  
      <b:if cond='data:post.title'>  
       <div class="post-title">  
        <b:if cond='data:post.link'>  
         <a expr:href='data:post.link'>  
          <data:post.title/>  
         </a>  
        <b:else/>  
         <b:if cond='data:post.url'>  
          <b:if cond='data:blog.url != data:post.url'>  
           <a expr:href='data:post.url'>  
            <data:post.title/>  
           </a>  
          <b:else/>  
           <data:post.title/>  
          </b:if>  
         <b:else/>  
          <data:post.title/>  
         </b:if>  
        </b:if>  
       </div>  
      </b:if>  
     </b:includable>  
    </b:widget>  
   </b:section>  
  </body>  
 </html>  
 

What did I add this time around?
  • Wrapped <b:include data='post' name='post'/> in a <div class="post-wrapper"> - used for styling each post (e.g., putting padding around the post).
  • Wrapped all of the conditional title stuff in a <div class="post-title"> - used for stying each title (e.g., changing removing link underlines, creating hover effect, etc.).
  • Added a link to the Marcellus Google font just below the <head> tag. See How to use Google's Font API with Blogger and Google web fonts. Note that bloggerbuster recommends making the <link> tag self closing. I used a closing tag instead. Just a preference.
  • Added CSS styling into the <b:skin> section. I'm not going to detail out how to do CSS or what these codes mean. I'll leave that to you.
And that's it! In the next post, I'm going to add some more detail to the post includable.

Wednesday, February 27, 2013

A Slight Expansion on the Bare Bones Blogger Template

In the last post, I created a very bare-bones Blogger template. While this may have been a little interesting, because it stripped the template down to its bare essence, it didn't show us much about what was going on under the hood because it used the magical 
    <b:section class='main' id='main' showaddelement='yes'>
      <b:widget id='Blog1' locked='true' title='Blog Posts' type='Blog'/>
    </b:section>
code to get the Blog widget to show up. Let's start unpacking that magic a little bit.

At the end of this post, I'll have a blog that includes only the title lines from my blog posts. They will be in-line because there will be no styling that causes them to break onto separate lines. It'll looks likes this:


Here's the template that produces the above blog:
    
<?xml version="1.0" encoding="UTF-8" ?>
<!DOCTYPE html>
<html 
  b:version='2' 
  class='v2' 
  expr:dir='data:blog.languageDirection' 
  xmlns='http://www.w3.org/1999/xhtml' 
  xmlns:b='http://www.google.com/2005/gml/b' 
  xmlns:data='http://www.google.com/2005/gml/data' 
  xmlns:expr='http://www.google.com/2005/gml/expr'
>
  <head>
    <meta content='IE=EmulateIE7' http-equiv='X-UA-Compatible'/>
      <b:skin>
        <![CDATA[
        /*
        -----------------------------------------------

        ----------------------------------------------- */
        
        ]]>
      </b:skin>
  </head>
  <body>
    <b:section class='main' id='main' showaddelement='yes'>
      <b:widget id='Blog1' locked='true' title='Blog Posts' type='Blog'>
        <b:includable id='main' var='top'>
            <b:if cond='data:numPosts != 0'>
              <b:loop values='data:posts' var='post'>
                  <b:include data='post' name='post'/>
              </b:loop>
            </b:if>
        </b:includable>
        <b:includable id='post' var='post'>
          <a expr:name='data:post.id'/>
          <b:if cond='data:post.title'>
            <b:if cond='data:post.link'>
              <a expr:href='data:post.link'>
                <data:post.title/>
              </a>
            <b:else/>
              <b:if cond='data:post.url'>
                <b:if cond='data:blog.url != data:post.url'>
                  <a expr:href='data:post.url'>
                    <data:post.title/>
                  </a>
                <b:else/>
                  <data:post.title/>
                </b:if>
              <b:else/>
                <data:post.title/>
              </b:if>
            </b:if>
          </b:if>
        </b:includable>
      </b:widget>
    </b:section>
  </body>
</html>
What's notable in this version?

As mentioned above, before the blog widget was included in a self-closing form:

    <b:section class='main' id='main' showaddelement='yes'>
      <b:widget id='Blog1' locked='true' title='Blog Posts' type='Blog'/>
    </b:section>

Now, the blog widget uses a opening and closing tag that allows a lot of coding goo to be inserted.
    <b:section class='main' id='main' showaddelement='yes'>
      <b:widget id='Blog1' locked='true' title='Blog Posts' type='Blog'>
        <!-- a lot of coding goo will go here... -->
      </b:widget>
    </b:section>

The next thing to notice that the Blog widget now has two children elements, both of which are 'includables':
    <b:section class='main' id='main' showaddelement='yes'>
      <b:widget id='Blog1' locked='true' title='Blog Posts' type='Blog'>
        <b:includable id='main' var='top'>
          <!-- includable code goes here -->
        </b:includable>
        <b:includable id='post' var='post'>
          <!--includable code goes here  -->
        </b:includable>
      </b:widget>
    </b:section>

According to the Blogger Help, "Widget content is contained in 'includable' sections". Check out the Blogger Help to learn more.

If we look at the main includable, we see:

        <b:includable id='main' var='top'>
          <!-- test to see if there are any posts -->
          <b:if cond='data:numPosts != 0'>
            <!-- loop to process each post -->
            <b:loop values='data:posts' var='post'>
                <!-- inserts an instance of the 'post' includable using the current post -->
                <b:include data='post' name='post'/>
            </b:loop>
          </b:if>
        </b:includable>

As indicated in the code comments, there is first a test to see if there are any posts. Then, there is a loop to process the posts. Finally, within the loop, an individual post is inserted using the post includable. So, let's look at the post includable.

     <b:includable id='post' var='post'>  
      <a expr:name='data:post.id'/>  
      <b:if cond='data:post.title'>  
       <b:if cond='data:post.link'>  
        <a expr:href='data:post.link'>  
         <data:post.title/>  
        </a>  
       <b:else/>  
        <b:if cond='data:post.url'>  
         <b:if cond='data:blog.url != data:post.url'>  
          <a expr:href='data:post.url'>  
           <data:post.title/>  
          </a>  
         <b:else/>  
          <data:post.title/>  
         </b:if>  
        <b:else/>  
         <data:post.title/>  
        </b:if>  
       </b:if>  
      </b:if>  
     </b:includable> 

A number of interesting things going on here:
  • Most of this is logic to determine (a) whether the title gets presented as a link or not and (b) where the link (if used) points to.
  • We start to see the use of data from the post. These are things like post.id, post.link, post.url and so on. To see all the data that's available to you, look at Blogger's Layouts Data Tags help.
  • In some instances, the title is wrapped in an <a> link. An expr is used (expr:href='data:post.link' or expr:href='data:post.url') to give the correct href link text. 
At this point, I have a basic blog with a listing of my post titles. It bugs me that they're all on one line and I'd like the links to be prettier. So, in my next post I'm going to do some formatting.

The Simplest Possible Template

I like to start from the very beginning. So, I wanted to start my template experimentation with a very, very basic template. Following is what I started with.


I was able to copy-and-paste this directly into Notepad++, save as an XML file, and upload to Blogger using the Backup / Restore button (upper right hand corner on the Template page) and it worked for me.

I think this bare-bones template is helpful because it lets you see the basic structure of a Blogger template:
  • There is an HTML element that contains two child elements - <head> and <body>. The opening HTML tag has a series of required attributes. You should just copy-and-paste these directly. It's not very important to know exactly what these are. 
  • The <head> element contains two elements - a <meta> element and a <b:skin> element. You won't have to worry about the <meta> element for a while. The <b:skin> element is where variables and CSS styling will eventually go - but I'll get into that in another post. 
  • The <body> element has one child - <b:section>. Every Blogger template MUST have at least one <b:section> element.
  • The <section> element has one child - <b:widget>. The widget, in this case, is a Blog widget (as indicated by type='Blog').
And with that, we have a very simple Blogger template. 

Blogger Templates Introduction

I recently decided to start blogging. After some brief research, I settled on the Blogger platform. 

I'm a bit of an "under the hood" kind of guy. I've coded a fair bit in Ruby on Rails and have ended up becoming proficient in ruby, the rails framework, javascript, CSS/SCSS, HTML, RSpec, BDD, and I don't know what else. I've also coded in VBA, Objective-C and a wee bit in C# a long time ago. So, naturally, I instantly wanted to start doing more customization that is possible via the normal dashboard. 

Apparently, like many people, I started Googling around for how-to's and reference information only to discover the documentation pretty much stinks. There are a couple of good posts out there (I'll put references in later). But, I thought I'd post my own experiences to see if I couldn't be helpful to someone else. 

So, that's what this is all about. My intention is to write a series of well-structured posts. But, I don't want to over think it. So, I'm going to just start posting and then clean up and refine as I go. 

For reference, I'm working in Windows 7 running on a MacBook Pro. I do my template editing using Notepad++. 


If you find this and have feedback, please drop a note. Thanks.

Thursday, February 14, 2013

Valentine's Day Cake

So, I made my mom's famous Valentine's Cake this year for the family:


Yummy!

Here's how you can do it, too.

You're going to need:
  • 1 chocolate cake box mix (and the ingredients the cake box calls for)
  • 1 - 8" square cake pan
  • 1 - 8" round cake pan
  • 1 can cherry pie filling
  • 1 recipe whippy creamy icing
  • Pastry bag and piping tips
A nice plate to put your finished cake on


Prepare the cake mix following the directions on the box. Pour into the square and round cake pans to an even level. Bake according to instructions (you may need to improvise a little since the cake box is unlikely to have instructions for 8" pans). After baking, remove from pans as instructed on box and cool on wire racks.


While cakes are baking, make the whippy creamy icing.

Put the square cake on your plate. Cut the round cake in half and put each half on adjacent sides of the square to make the heart shape.

Ice the cake. Pipe on some nice decorations, making sure to have a high lip at the edge to keep the cherries on.

Refrigerate so that the icing sets.

Spoon cherry pie filling onto top of cake.

And there you have it! Enjoy...

Friday, February 8, 2013

Thollem McDonas

Thollem came and played at the Transfiguration Episcopal Church music series. It was magical!


Sunday, January 6, 2013

Rosca de Reyes

Here's the bread we made for the Feast of the Three Kings (January 6th).

We started by making a nice dough...


Then we rolled it out (after having kneaded in some candied fruits)...


Then we did some fancy work to get the basic shape... 


We added decorative dough... 


And some candied cherries... 


Here it is out of the oven! 


Then, we added icing.